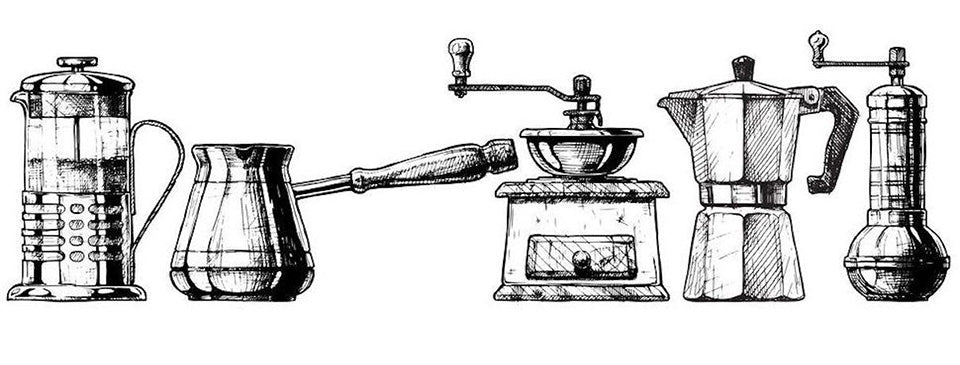

(If you thought it was complicated before... but seriously, this is a damn cool print, go buy it at Popchartlab.com)

(My coffee armory - definitely a coffee nerd :-S )
How did we become coffee nerds to start with? Well i put myself through uni working at various cafes and restaurants as a barista, but i’ve actually learnt most of my coffee nerdiness from my brother. I taught him to pour his first cappuccino but he’s since surpassed me and now runs his own cafe in Canberra (Canberra folk should go check it out - Hideout in Barton - while you’re there tell him how much he should be stocking upgraded coffee ;-) ). Every x-mas i get a new coffee related gift like a aeropress / syphon / pour-over and I love it, totally hooked on being a coffee nerd.
However, that doesn’t mean everyone needs to be one to enjoy a bulletproof coffee. We’re here to help you figure out how to get started and run through each of:
● Brewing methods
● Grinders
● Blenders
● Storing your beans
● What to drink your coffee out of
We’ll cover stuff like travel options (I fly ~50 times a year with the day job and don’t feel like myself without bulletproof coffee - blending butter with coffee is always a good icebreaker in client meetings ;) ) and how to select equipment and hack the process to fit your budget.
One thing to bear in mind with a bio-hacking mindset towards coffee is that we drink coffee to optimise health and performance whereas other hipster types (sorry bro...) want to drink coffee optimised for taste instead. So we have to do things slightly different to those guys.
Brewing methods
Bio-hackers want to make sure that they are brewing with a metal filter so that we don’t end up filtering out the potent anti-neuro inflammatory compounds Cafestol and kahweol. Keeping that in mind the various brewing methods are:
● Espresso - the big machines in your local coffee shop. These are metal filtered and awesome for cafes because they can afford awesome La Marzocco ones and maintain and tune them up regularly. For us mere mortals the consumer grade ones don’t really cut it and end up producing pretty rough coffee over time.

● Stove pot - these are a low tech version of an espresso machine and probably better for at home use, but they need a bit of supervision otherwise you can burn your coffee real good (bad)...

● Pour-over - These use paper filters in general so they are not ideal if you want to maximise the anti-inflammatory properties of the coffee. Upsides are that they are either all glass or ceramic in construction so you skip BPA related concerns. I still use pour-over occasionally but it is not my primary method of making coffee. If you were drinking a really expensive single origin type coffee then this is what you’d use, but then your coffee would be mouldy and you’d be a dirty hipster (can’t help it bro). The kings of pourover are Chemex and the Hario V60 (travelling) or V80 (at home/office).


● Syphon - this is a less common method and there are various European or Japanese style machines. Watch a youtube video to see these things working, it’ll take me a page to describe it and it’ll still be confusing... These are a step above the pour-over in terms of coffee tasting status (they are very controllable wrt temp and time of extraction). Hack them by retrofitting with a butane burner rather than an oil one. I’ve got one of the Hario units but it doesn’t get much use because it takes too long to make a cuppa and has a cotton filter. I will crack it out at dinner parties and use little beakers to serve the coffee if I feel like showing off (must have a recessive version of the H gene somewhere)


● Cold Drip - iced water is used to drip extract the coffee over 8-12 hours. This can be used with a metal filter so would be a good option if you are organised enough to plan ahead. The coffee from this method has a unique taste that borders on a liqueur. Its delicious on its own but you’re going to struggle blending it with butter if you can’t melt it!

The top two
● French press - Portable, metal filter and glass construction. Dave Asprey is an advocate of this method. Downsides are that they can break when packed in luggage (I’ve lost a couple this way but metal construction ones exist). It is a very simple process to make your coffee and a good starting point. You would probably want to get a Bodum french press but you can hack a cheaper one by unwinding the spring that supports the filter to make sure you get a good seal and avoid getting gritty coffee. Hack number 2 is that you can “blend” your butter and MCT by plunging the press in these guys - just make sure you get the grinds out of there first (transfer the coffee into a different container after you’ve brewed it).

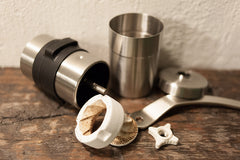
● Aeropress - After you retro-fit these with a reusable metal filter (hack) this is my preference. They’ll produce a stronger flavoured coffee than a french press which helps to balance the butteriness of a BP coffee. The downside is the plastic construction and non-BPA baddies risk (Aeropress are made from BPA free materials but this isn’t always a guarantee of health effects). These guys cost ~$50 so won’t break the bank and are a good option for both travel and home use. There are plenty of trick videos on the net of tricks with brewing these guys but all I do is let the thing gravity drip itself a bit while brewing before i top it up and plunge it. This gives me more mls of coffee out of the thing.

Grinders
The basic requirement here is that you get a conical burr grinder this will give you the best uniformity of your grind (all the grains will be the same size). The other options are the herb chopper type machines which aren’t good enough if you ask me (but if you’ve already bought a chopper type grinder its not going to kill you). From there you’ve got a couple second order optimisations.
The mobile/budget conscious option here is a hand grinder. These will be cheaper than an electric powered one but do take a bit of effort to do the work. Couple of options are:
● Hario Mini Slim and Kyocera CM45-CF are both fairly common suggestions for the smaller travel type units. There is nothing particularly wrong with either of them, they’re both a solid start and my Hario from 2.5 years ago is still going strong! But there is another option...
● The Mini Porlex is the best option in my book, its made from stainless (less BPA risk) and actually fits inside the barrel of an aeropress so it makes a really neat travel kit. Also the handle is slightly longer than the Hario one so it gives you a bit more leverage on it.

Electric grinders are what you’d have as part of your “daily driver” setup at home though. As well as being easier to use they perform a lot better for coarse grinds. A couple of examples are:
● This Sunbeam unit is a good example of one that is not too expensive, has solid build and comes with a great little funnel to stop from getting your grinds everywhere (http://www.sunbeam.com.au/products/kitchen/em0480/)
● We have also since discovered the Baratza Encore. The Baratza is a much better grinder in our opinion. We have put several of the sunbeam units through their paces at conferences and other events and wore them out. We're on our first set of Baratza units and they're still going strong. The theoretical benefit of a better grinder is to avoid burning the beans with the heat from the grinding process... But there aren't many people who could legitimately pick the difference (i don't think). So the practical benefits of the Baratza are:
- Its a lot heavier - so it moves around less on your bench and the hopper doesn't vibrate loose
- The hopper fits very well and the mess of loose grinds is fairly minimal You can buy a hopper extension if you want to fit more beans in it.
- Baratza are a great company that focus on coffee equipment only - so we're happy to rely on their more specialist equipment, and the pricepoint is pretty reasonable too!

● A couple of examples you should avoid are:


(The Bodum unit is a chopper type and will not give a uniform grinder, the Delonghi unit is conical burr but the vibrations from operating it will loosen the hopper and get grinds everywhere)
What to drink your coffee out of
Again we have some ongoing themes here to consider here wrt BPA and other nasties that you might contaminate your coffee with, but also in a more day to day sense you want to keep your coffee warm while you drink it. My top suggestions are:
● For travel you can’t go past Klean Kanteen. The wide mouth dual wall units are awesome and the TAD gear collaboration one has a cool print on it. The product is BPA free and 99% stainless so has a v. low risk of contaminating your coffee.

● There are other BPA free dual wall options (e.g. http://www.bodum.com/int/en-us/shop/detail/11041-01/?navid=61) but I would steer away from any plastics/polymers regardless. BPA isn’t the only bad thing that you might be exposing yourself to.[2]
● At home you can’t really get anything cooler that the Bodum double wall glasses, but they’re expensive. While they’re more robust than they look, when they break you end up with two glasses worth of broken glass pieces (bonus) and whenever you have a house party your friends will want to use them because they look awesome - seriously, lock em up. Try to get the ones with the rubber strip around the outside, this is there as a vibration dampener and does a decent job of protecting them.

(Bodum dual wall glasses are cool for coffee and, in a previous life, beer too... *tear*)
● If you want to take it to the next level (like Dave Asprey) you can fit your house out with laboratory grade glass (http://www.labdirect.com.au/). Even glass can contaminate your food depending on what type/grade it is and lab grade is much higher quality than food grade.
Super Hack Alert you can almost eliminate the need for blending your coffee with a Klean Kanteen. Here’s how:
Put your coffee, butter and MCT in the Kanteen, then seal and shake.
This will give a result that is comparable to using a hand blender but not as foamy as using a good quality standing blender. I’m not going to lie to you and say its as good as using a Blendtec but I guess the best endorsement is that I don’t travel with a hand blender anymore and if I’m running late for the train in the morning then this is what I do (unfortunately this is most days...).
Blenders
Like i’ve said above hand blenders are pretty much redundant as long as you have a sealed container with which to shake the crap out of your BP coffee. However there are a range that people will use from milk foamers through to 700 Watt stick blenders. I haven’t noticed much to differentiate the brands aside from:
● Getting the blender attachments on and off can be effortful if the buttons are too small - have a play with the demo units in the store. Its a minor annoyance but its worth having a look at.
● The food processing attachments are where its at. I don’t use my stick blender for coffee anymore but i still use the food processor attachments for cooking.
For a standing blender the Blendtec is the cream of the crop. However for those of us (I’m not spending $600 on a blender either) who aren’t going to buy one of them I don’t think that your coffee is going to know much of a difference between your selection in the $50-$100 range. The trick when blending coffee is that you want to pop the insert of your lid off the blender before you start blitzing your coffee otherwise the hot air will expand and you will explode hot buttery coffee all over the place (yes, I am speaking from experience, the office tea room will never smell the same again). Cover the hole with a folded up piece of paper towel or similar and be careful you don’t burn your hand.
Also - don’t use a magic bullet because the plastic they use isn’t very high quality at all. I can actually feel the difference if I use a magic bullet for my coffee.
Storing your beans
There are a few options for storing your beans. Ultimately you don’t want to be buying the small bags of coffee for everyday use so invariably you’ll end up on the 2.25kg bags (which don’t work out too bad per cup compared to typical high quality, single origin coffee). You don’t want your coffee to go stale so here are your options in order of priority:
● Split your coffee into weekly portions, vacuum seal and freeze. When you defrost make sure you let the beans get to room temperature before you open the bag.
● Hack of the above is to double sandwich bag pressing the excess air out (to avoid condensation upon defrosting). Then when defrosting: Make sure you keep your freezer door closed because defrosting and refreezing can allow for extra condensation in the bags which will be detrimental to your coffee (water -> mould). Do a 2 stage defrost where you go from freezer to fridge overnight first and then fridge to room temperature the next day (let the beans get to room temperature before you open the bags - v. important)
● Keep your weeks worth of coffee in a vacuum sealed airtight container like the Airscape which protects your beans from light, air and moisture.
Summing up
Lots of people ask us about coffee so I hope this has been helpful for you. Please comment or msg/email us if we’ve missed anything and we’ll revise this as somewhat of a living document as our taste/knowledge develops.
[1][2]

Share:
Giveaway: Win 1 of 2 Personalised Signed Copies of How To Eat an Elephant!
Bulletproof Diet and Weight Loss